One of the first things you should new do when setting up a new website is to install all the necessary analytics accounts. If you do this on day one, the website will be tracked and you can start creating reports from the data right away.
I’m going to teach you how I set up my analytics account by account in the exact order I do to set my customers up for success. These instructions will work for any website CMS.
Google Tag Manager
Google Tag Manager is a script management tool created by Google. The main purpose of Google Tag Manager is to keep marketers out of programmers coding. You can install scripts from Facebook, LinkedIn, third-party software, and custom code right into the Google Tag Manager dashboard, preview how the changes affect the website, then publish them live, all without ever going in the website’s backend.
The first thing you need to do with Google Tag Manager is to go to https://tagmanager.google.com/ and create an account. At New Hill Marketing, we like to create Gmail accounts for each of our clients, that way there’s one login for each client for everything we need access to. Either way, the first step is to use a Gmail account and create a Google Tag Manager account. When you first create the account Google Tag Manager should give you a pop up that has the tracking information, but if you didn’t notice it you can still find it by going to Admin -> Install Google Tag Manager and get your code from there. Follow the instructions to install Google Tag Manager into your website’s backend, or provide the code to your developer and have them install it following the instructions. This will be the last time you need to do anything with your website’s backend in terms of analytics accounts. Once the code is installed, its time to create your Google Analytics account in order to track anything.
Google Analytics
Now that Google Tag Manager is installed it’s time to install Google Analytics. This is where the fun really begins. Go to https://analytics.google.com/analytics/web/ and similar to Google Tag Manager, create a Google Analytics account. Again, at New Hill Marketing we like to create these using the custom Gmail account for that client. Once your account is created, you should get a pop up with the tracking information. Now at this point, if you didn’t have Google Tag Manager already installed, you would take this code and put it directly into your backend, but with Google Tag Manager also being a Google product, it’s very simple to connect the two. You don’t need the entire tracking code, you just need the Tracking ID. To find this go to the Admin section of Google Analytics, then under “Property” you’ll find “Tracking Info” and from there you can go to “Tracking Code” and find your Tracking ID. It should be something like UA-#########-#. Copy that Tracking ID and go back to Google Tag Manager.
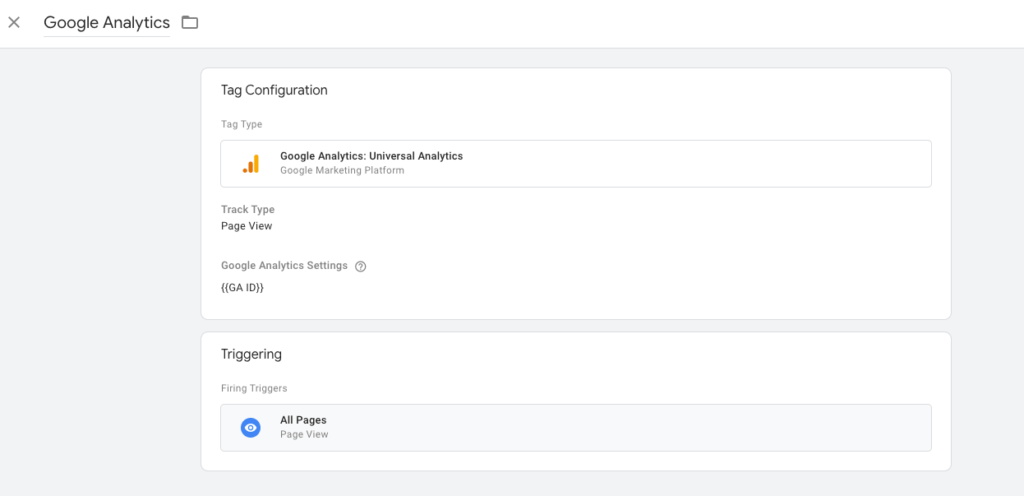
In your Workspace, find Tags. From there create a new Tag and name it Google Analytics. Under Tag Configuration choose “Google Analytics: Universal Analytics” set the Track Type to Page View (it should be there by default but just be sure it’s the chosen one). Then you’re going to need to set up a Variable right on that same screen. Create the variable, and inside the variable enter the Tracking ID in the proper spot. I usually name this variable “GA ID” because in my future setups I use this variable often.
Once that’s saved you can go back to the Tag configuration and set the Triggering to trigger on all pages. The final tag should look something like this:

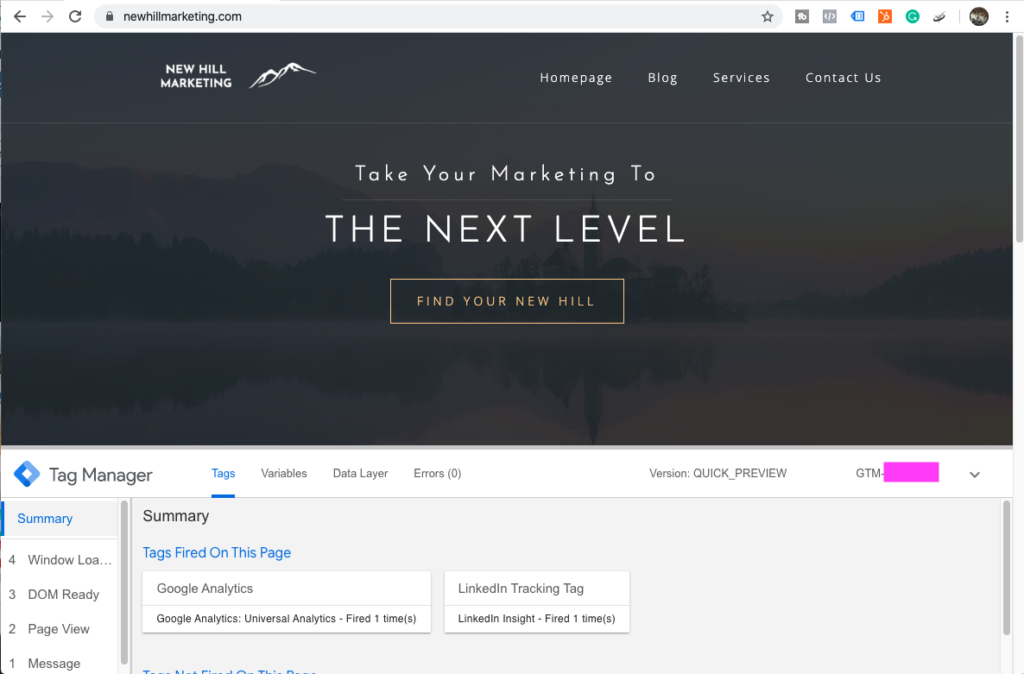
Now at this point, nothing is live in Google Tag Manager until you hit “submit”. You can also “preview” the changes you made. When you click preview you won’t notice anything major changing, but hit preview and go to your website. You’ll now notice at the bottom of your site Tag Manager is there. Don’t worry, only you can see this in the same browser that Google Tag Manager is previewing it. The point of this is to show you the tags that are running properly. It’s important to test these and make sure it’s running on the pages you want. It should look something like this:

Now that we can see Google Analytics is running, we can leave preview mode and go ahead and submit the changes.
Google Search Console
Now we’re going to want to set up Google Search Console. This is something to help us track our keywords and how our website is ranking. Go back to Google Analytics into the admin section and under Property go to Property Settings. Scroll until you find the section “Search Console” and select “Adjust Search Console”. Now setting up Google Search Console is a little bit more advanced, so at this point, if you’ve been confused throughout this process, you may want to consider hiring someone to install this for you so it’s done properly.
In a future blog I will outline exactly how to set this up, but for now, check out this support article from Google on how to add a website property.
Other Analytics Accounts To Install
There are a ton of analytics accounts you can install into Google Tag Manager. Such as a Facebook Pixel, LinkedIn Tracking Tag, Google Ads Conversion tracking plus 50 others. And if there’s not a pre-set up tracking tag already created in Google Tag Manager, then you can use the custom HTML tag and install custom code into your website’s backend through Google Tag Manager.
Setting up analytics accounts can be very hard, and it took me years to learn how to do them properly and with speed. It’s something that takes time to learn and takes even longer to master. This is why I offer this service to every one of my clients, whether their website is new and I built it, or it’s an older website that I now manager, I make sure to install all the analytics accounts they need, or could ever want to be sure we’re getting all the data accurately and efficiently. Being in this industry I see analytics accounts improperly set up on a regular basis, which is disheartening because you lose out on such great data that can help you make more informed business decisions. If you work with New Hill Marketing, you can be confident in knowing that all your analytics accounts are going to be set up properly the first time. Contact us today and get started.

